How to Apply DTF Transfers
No special skills needed. Apply with a heat press for best results, or use a regular household iron.
Pre-press your garment
Press the garment for 3–5 seconds to remove moisture and wrinkles. This ensures a smooth, even surface for the transfer.
Position the transfer
Place the DTF transfer face-down on the garment exactly where you want it. The printed design should be touching the fabric.
Tip: Use a ruler or tape measure to center the design. For chest prints, measure 3–4 inches below the collar.
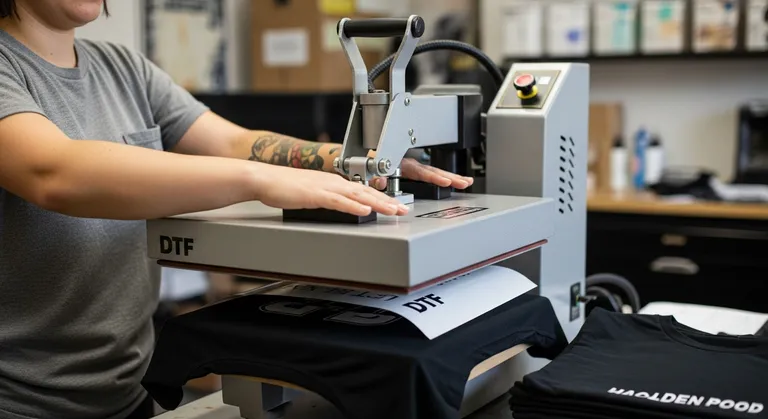
Press with heat & pressure
Close the heat press and apply firm, even pressure for 6–10 seconds. The heat activates the adhesive and bonds the ink to the fabric fibers.
🔥 280–300°F (140–150°C)Peel the film
Immediately peel the clear carrier film away at a 45° angle while the transfer is still hot. Instant peel — no waiting required.
Tip: Peel steadily and smoothly for the cleanest result.
Re-press to seal
Cover the print with parchment paper or a Teflon sheet, then press again for 5–10 seconds. This final press locks in the adhesive for maximum wash durability.
Tip: Don't skip this step — it's the difference between 20 washes and 50+ washes.
Wash & Care Tips
Troubleshooting
Edges lifting after wash
Cause: Incomplete adhesive bond
Fix: Re-press with parchment paper for 15 seconds. Always do the final re-press step after peeling.
Design looks dull or matte
Cause: Temperature too high or over-pressed
Fix: Make sure temperature is 280–300°F. Don't exceed 10 seconds. Peel immediately after pressing.
Transfer won't stick at all
Cause: Temperature too low or fabric moisture
Fix: Verify temp is 280°F+. Pre-press the garment first to remove moisture. Make sure pressure is firm and even.
Film won't peel cleanly
Cause: Under-pressed
Fix: The adhesive hasn't fully activated. Re-press for 5–10 more seconds, then try peeling again.
Still have questions? Check our detailed guides or reach out to support.